
Finger looming is a fun and accessible craft, allowing you to create woven items using just your fingers. It’s a great way for beginners to learn basic weaving techniques. The method is simple, convenient, and doesn’t require any special equipment.
What is Finger Looming?
Finger looming is a method of creating woven crafts using only your fingers as the loom. Instead of using a traditional loom or knitting needles, you interlace yarn or thread around your fingers to form loops and patterns. This technique is a simple, portable and convenient way to produce bracelets, keychains, and other decorative items. It is a popular craft among people of all ages, especially kids, because of its accessibility and ease of learning. It’s a great way to introduce the basics of weaving and looping without needing any special tools or equipment. Finger looming can be used to make a wide variety of items and allows for creativity and personal expression through color and design. The method is also very versatile, lending itself to different yarn types and weaving patterns.
Benefits of Finger Looming
Finger looming offers several advantages, making it a popular craft. Firstly, it’s incredibly accessible, requiring no special tools, just your fingers and some yarn or thread. This makes it a great activity for on-the-go crafting, since you can do it practically anywhere. Secondly, finger looming is a very cost-effective hobby. It only requires minimal materials, making it an affordable option for crafting enthusiasts. Furthermore, it’s a fantastic way for kids to develop their fine motor skills and hand-eye coordination. The simplicity of the technique is also very good for introducing basic weaving patterns. Finger looming also encourages creativity through the use of different color combinations and patterns, allowing for unique, handcrafted items. It is also very relaxing and can be a form of stress relief.

Materials Needed for Finger Looming
To start finger looming, you’ll primarily need yarn or thread. The type and thickness depend on your project. Optional tools include clips or hooks for securing ends and joining pieces, enhancing the process.
Yarn or Thread Selection
Choosing the right yarn or thread is crucial for successful finger looming. Consider the desired thickness and texture for your project. Thicker yarns create bulkier, quicker projects, while thinner threads allow for more intricate designs and finer details. Experiment with various materials like cotton, wool, or acrylic, each offering unique characteristics. Color selection is also vital; choose shades that complement your desired aesthetic. For beginners, using a consistent, medium-weight yarn can simplify the learning process. Feel free to explore different colors to make your final product more vibrant. When you are choosing the yarn, consider the final use of the product, making sure the yarn is appropriate for that. Remember to have fun when making your color choice.
Optional Tools⁚ Clips and Hooks
While finger looming primarily relies on your fingers, optional tools like clips and hooks can enhance the process. Clips, often C-clips or S-clips, are useful for securing the ends of your woven pieces, preventing them from unraveling and providing a neat finish. These small clips connect the beginning and end of a bracelet or keychain. Hooks, typically crochet hooks, can aid in manipulating the loops and tightening knots, especially when working with finer threads. These tools make it easier to work with multiple bands. Using clips and hooks can simplify the process, but are not always necessary. These tools will assist you in making the finger looming project, making it much easier.
Basic Finger Looming Techniques
Mastering basic techniques is crucial for finger looming. Starting with the basic loop method, you can then explore patterns like the fishtail. These will allow you to create simple and beautiful designs.
The Basic Loop Method
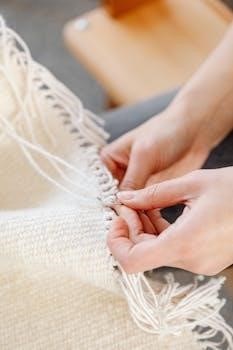
The basic loop method is fundamental to finger looming. Begin by holding your hand with your palm facing up. Take your chosen yarn or thread and create a loop around two fingers, usually your index and middle finger. Ensure the loop is snug but not too tight. Now, bring the yarn behind your fingers and loop it over the front again. This creates a second loop. Repeat this process of looping over and under, ensuring each new loop is placed directly above the previous one. This forms the foundation of your finger-loomed project. You will pull the bottom loop over the top loop, alternating between the two fingers.
Creating a Fishtail Pattern
The fishtail pattern introduces a slightly more intricate design to finger looming. Start with the basic loop method, placing two loops on your fingers. Instead of simply pulling the bottom loop over, you’ll now work with two loops on each finger. Take the bottom loop from one finger and bring it up and over the other two loops on that same finger, then pull it off, dropping the loop into the center of your project. Repeat this process with the other finger. This action creates the characteristic fishtail braid. Continue alternating fingers and pulling the bottom loop up and over to form the distinctive pattern.

Advanced Finger Looming Techniques
Once comfortable with basic methods, explore advanced techniques. These include incorporating multiple colors, creating ribbed loops for texture, and experimenting with different patterns and designs. These skills allow for more complex projects.
Incorporating Multiple Colors
Adding different colors to your finger looming projects can create vibrant and visually appealing designs. To start, select the yarn or thread colors you want to use and arrange them in the order you want them to appear in your design. When beginning, simply use the first color for the initial loop. Then, introduce a new color by looping it in the same way, continuing the process. Ensure the different colors are well-integrated, and maintain consistent tension to avoid any unevenness in the finished product. For a striped effect, change colors at regular intervals; for a more random pattern, switch colors as desired. Experiment with different color combinations to find the perfect look for your creation. Remember to keep the transition between colors as smooth as possible.
Adding Ribbed Loops
To add texture and visual interest to your finger looming projects, you can incorporate ribbed loops. This technique involves wrapping the yarn or thread around your fingers in a twisted manner. Instead of simply looping the yarn straight, give it a half-twist before placing it on your fingers. This twist creates a raised, ribbed effect on the surface of your finger looming work. As you continue the looping process, ensure each new loop is twisted in the same direction for a consistent ribbed pattern. Experiment with different amounts of twist to vary the tightness and appearance of the ribbing. Ribbed loops add a unique dimension to your projects, giving them a more intricate and crafted feel, making them stand out from standard loops.
Finger Looming Projects
Finger looming opens up a world of creative possibilities. From bracelets and keychains to headbands and more, you can create various items. This section will explore some fun ideas to get started.
Making Bracelets
Bracelets are a popular project for finger looming, and they are a great way to express creativity. Start by choosing your favorite yarn or thread colors; this allows for personalized and unique designs. To begin, secure the yarn around your fingers, and then using the basic loop method or the fishtail pattern, proceed to create the length you desire. Remember to maintain consistent tension to ensure the bracelet is even and comfortable. Once you have reached the desired length, you can attach a clip to secure the ends. You can also experiment with different color combinations and patterns. The possibilities are endless, making each bracelet a personal creation.
Creating Keychains
Finger looming keychains is a fun and simple way to make personalized accessories. Begin by selecting durable yarn or thread suitable for everyday use. Start the finger looming process using your chosen method, such as a basic loop or a fishtail pattern. You will want to aim for a smaller, more compact creation when compared to bracelets. After reaching the desired length, securely fasten the end of the loop. Attach a keychain ring to one end using a clip or knot. This will allow you to easily attach your keys. This can also be done with a variety of colors and patterns. This makes for a unique and personal gift.
Tips and Tricks for Finger Looming
Mastering finger looming involves a few key tips. These include maintaining even tension, experimenting with colors, and being patient. Don’t be afraid to undo and start over. These will help refine your projects.
Maintaining Consistent Tension
Maintaining consistent tension is crucial for successful finger looming projects. Uneven tension can lead to a finished piece that’s loose in some areas and too tight in others, affecting the overall look and durability. When wrapping yarn around your fingers, ensure that you pull with the same amount of tightness each time. Avoid wrapping too tightly, as this can make the process uncomfortable and cause the loops to be difficult to work with. Instead, aim for a gentle, even pressure. If you notice your loops becoming uneven, take a moment to adjust them before continuing. Practice will help you find the perfect balance and achieve a consistent weave. This skill is developed with time and patience, and will greatly improve the quality of your work.
Troubleshooting Common Issues
Finger looming can sometimes present challenges, but many issues are easily resolved. If your loops are slipping off your fingers, it may be because they are too loose or your fingers are too slippery. Try tightening the tension of the loops slightly, or ensure your hands are clean and dry before starting a project. If the yarn is tangling, pause and gently untangle it to avoid further issues. If you notice the loops are too tight, try loosening your grip and adjusting the tension. If your bracelet or keychain feels uneven, ensure you’re pulling each loop with the same consistent pressure. If you can’t seem to fix the issue, consider starting over. Don’t get discouraged, as practice improves the results.